tile cleaning

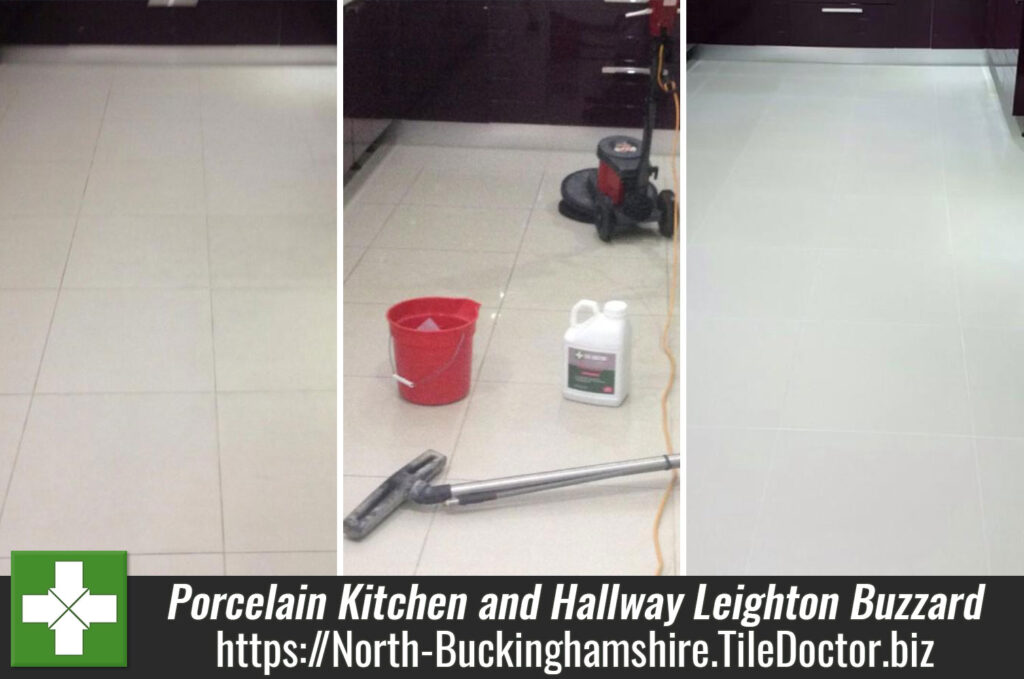
Porcelain Tiled Kitchen and Hallway Refresh in Leighton Buzzard

Tile Cleaning and Grout Re-Colouring of a Porcelain Tiled Kitchen in Buckingham

Grout is an incredibly important feature of tiled floors, not just from a structural perspective, but from an aesthetic perspective too. If the grout lines are dirty and stained, it ruins the overall look of the floor. It’s important to try and keep them clean, but with grout being rough in nature it does attract dirt and if left un-checked it can easily get to the point where cleaning becomes very difficult.

A good case in point was this Porcelain tiled kitchen floor at a property in the historic university town of Buckingham. The floor had been installed approximately eight years prior and while during this time the property owner had made the best efforts to keep the tiles clean, the dirt and grime had begun to build up – particularly in the grout lines.

I visited the property to see what could be done, starting with an initial test clean with a strong solution of our high alkaline cleaner, Tile Doctor Pro Clean. The tiles came up beautifully, but due to the extreme porosity of the grout, some of the dirt had been absorbed too deeply into the grout to get it completely clean.

Porcelain Floor Before Cleaning in Buckingham
The customer was worried that this would mean ripping all the grout out and re-grouting, which is a messy and time consuming process. As an alternative, I advised him that recolouring the grout would be the better option, using one of the excellent grout colorants made by Tile Doctor which are available in ten popular colours.

These products not only restore a clean and uniform appearance to the grout, they also provide a waterproof barrier which prevents any dirt and grime from penetrating the grout in the future. The recolouring process is a relatively quick, affordable, and a tidy alternative to re-grouting.

Cleaning Porcelain Tiles and Grout

Impressed by the efficiency of the Pro Clean product and the cleanliness of the test patch, the customer requested that we go ahead and deep clean the tiles and re-colour the grout.

The work took two days. On the first day, we deep cleaned all the tiles and grout using the same strong solution of Pro-Clean. The solution was applied to the floor and left to dwell for approximately ten minutes and from there I used a rotary machine fitted with a black scrubbing pad to loosen the soil from the tiles.

Once the floor had been thoroughly scrubbed, I used our wet pick up and rinsing machine to remove all the dirty water, and rinse the floor with clean water.

Porcelain Floor During Cleaning in Buckingham
Next we moved on to cleaning the grout. I started by applying Tile Doctor Pre-Treatment Cleaner and left it for approximately 15 minutes before scrubbing it in by hand using a stiff grout brush.

This process serves two purposes: firstly, it helps to remove as much dirt as possible from the grout lines prior to re-colouring and secondly, the acidity in the product etches the grout slightly, helping to make a better bond with the Grout Colourant.

Once the process was complete, I rinsed and dried the floor one more time and left it to dry off overnight.

Recolouring Grout

The next morning, I returned to colour and seal the grout with an Ivory Grout Colourant as selected by the customer. The process is quite straight forward and involves using a small brush to carefully apply the colorant along each grout line. When I was finished, I made sure to clean any excess product off the tiles before it had time to dry.

Finally, I buffed the floor with a fine white buffing pad, leaving the tiles looking clean and fresh, with the grout uniform. The customer was absolutely delighted with the service and the results.

Porcelain Floor After Cleaning in Buckingham
 

Restoring the Appearance of Porcelain Tile and Grout in a Buckinghamshire Kitchen

Tile Cleaning and Grout Re-Colouring of a Porcelain Tiled Kitchen in Buckingham Read More »

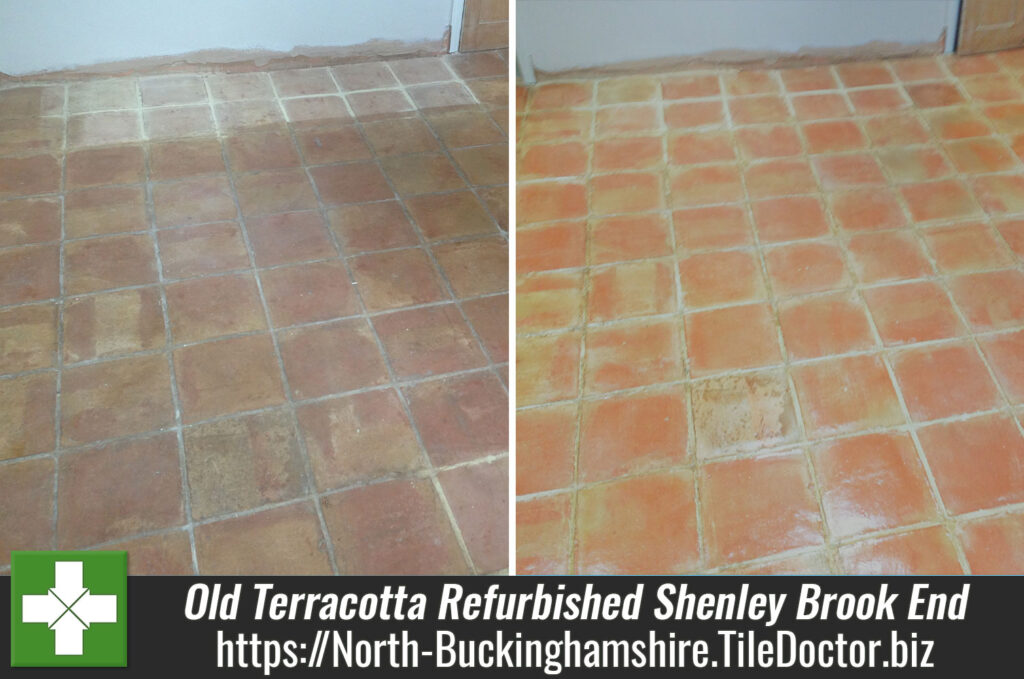
Old Terracotta floor refurbished in Shenley Brook End

Old Terracotta floor refurbished in Shenley Brook End

This old Terracotta floor in Shenley Brook End near Milton Keynes was already dirty with very little sealer intact when our customer moved into the property. Then after having extensive building work done throughout the property they were in desperate need of a Tile Doctor service to improve the look of the floor.

Old Terracotta Floor Before Cleaning in Shenley Brook End

Cleaning Old Terracotta Floor Tiles

We started by applying a strong dilution of Tile Doctor Pro-Clean to the floor which is our go to cleaning product for all types of Tile, Stone and Grout. After approximately 20 minutes of dwell time we scrubbed the floor with a black scrubbing pad fitted to a rotary machine. This broke down most of the dirt and removed any remaining sealer. Once the whole floor had been treated in this manner it was rinsed thoroughly with water which was then extracted using a wet vacuum.

Having removed the soiled cleaning solution, we could see the result achieved on the floor and although there was a massive improvement there were some tiles we still were not totally happy with. We went back to these tiles and applied a stronger Tile Doctor product called NanoTech HBU which stands for Heavy Build-Up remover. We gave this an hour to dwell.

Whilst the NanoTech was doing its magic on the problem tiles we went to work scrubbing all the grout lines by hand using more Pro-Clean. Once we had finished cleaning the grout we gave the whole floor one more rinse and were pleased to see the problem tiles were now looking much better.

Sealing Old Terracotta Floor Tiles

We then left the floor to dry off completely overnight and returned the following day to seal the floor. Made from clay Terracotta is very porous and needs to be sealed to stop dirt becoming ingrained in the tile, it also improves its general appearance.

To fully seal the floor, we used six coats of Tile Doctor Seal and Go which will provide complete protection against stains and dirt, Seal and Go also adds an appealing satin sheen to the tile.

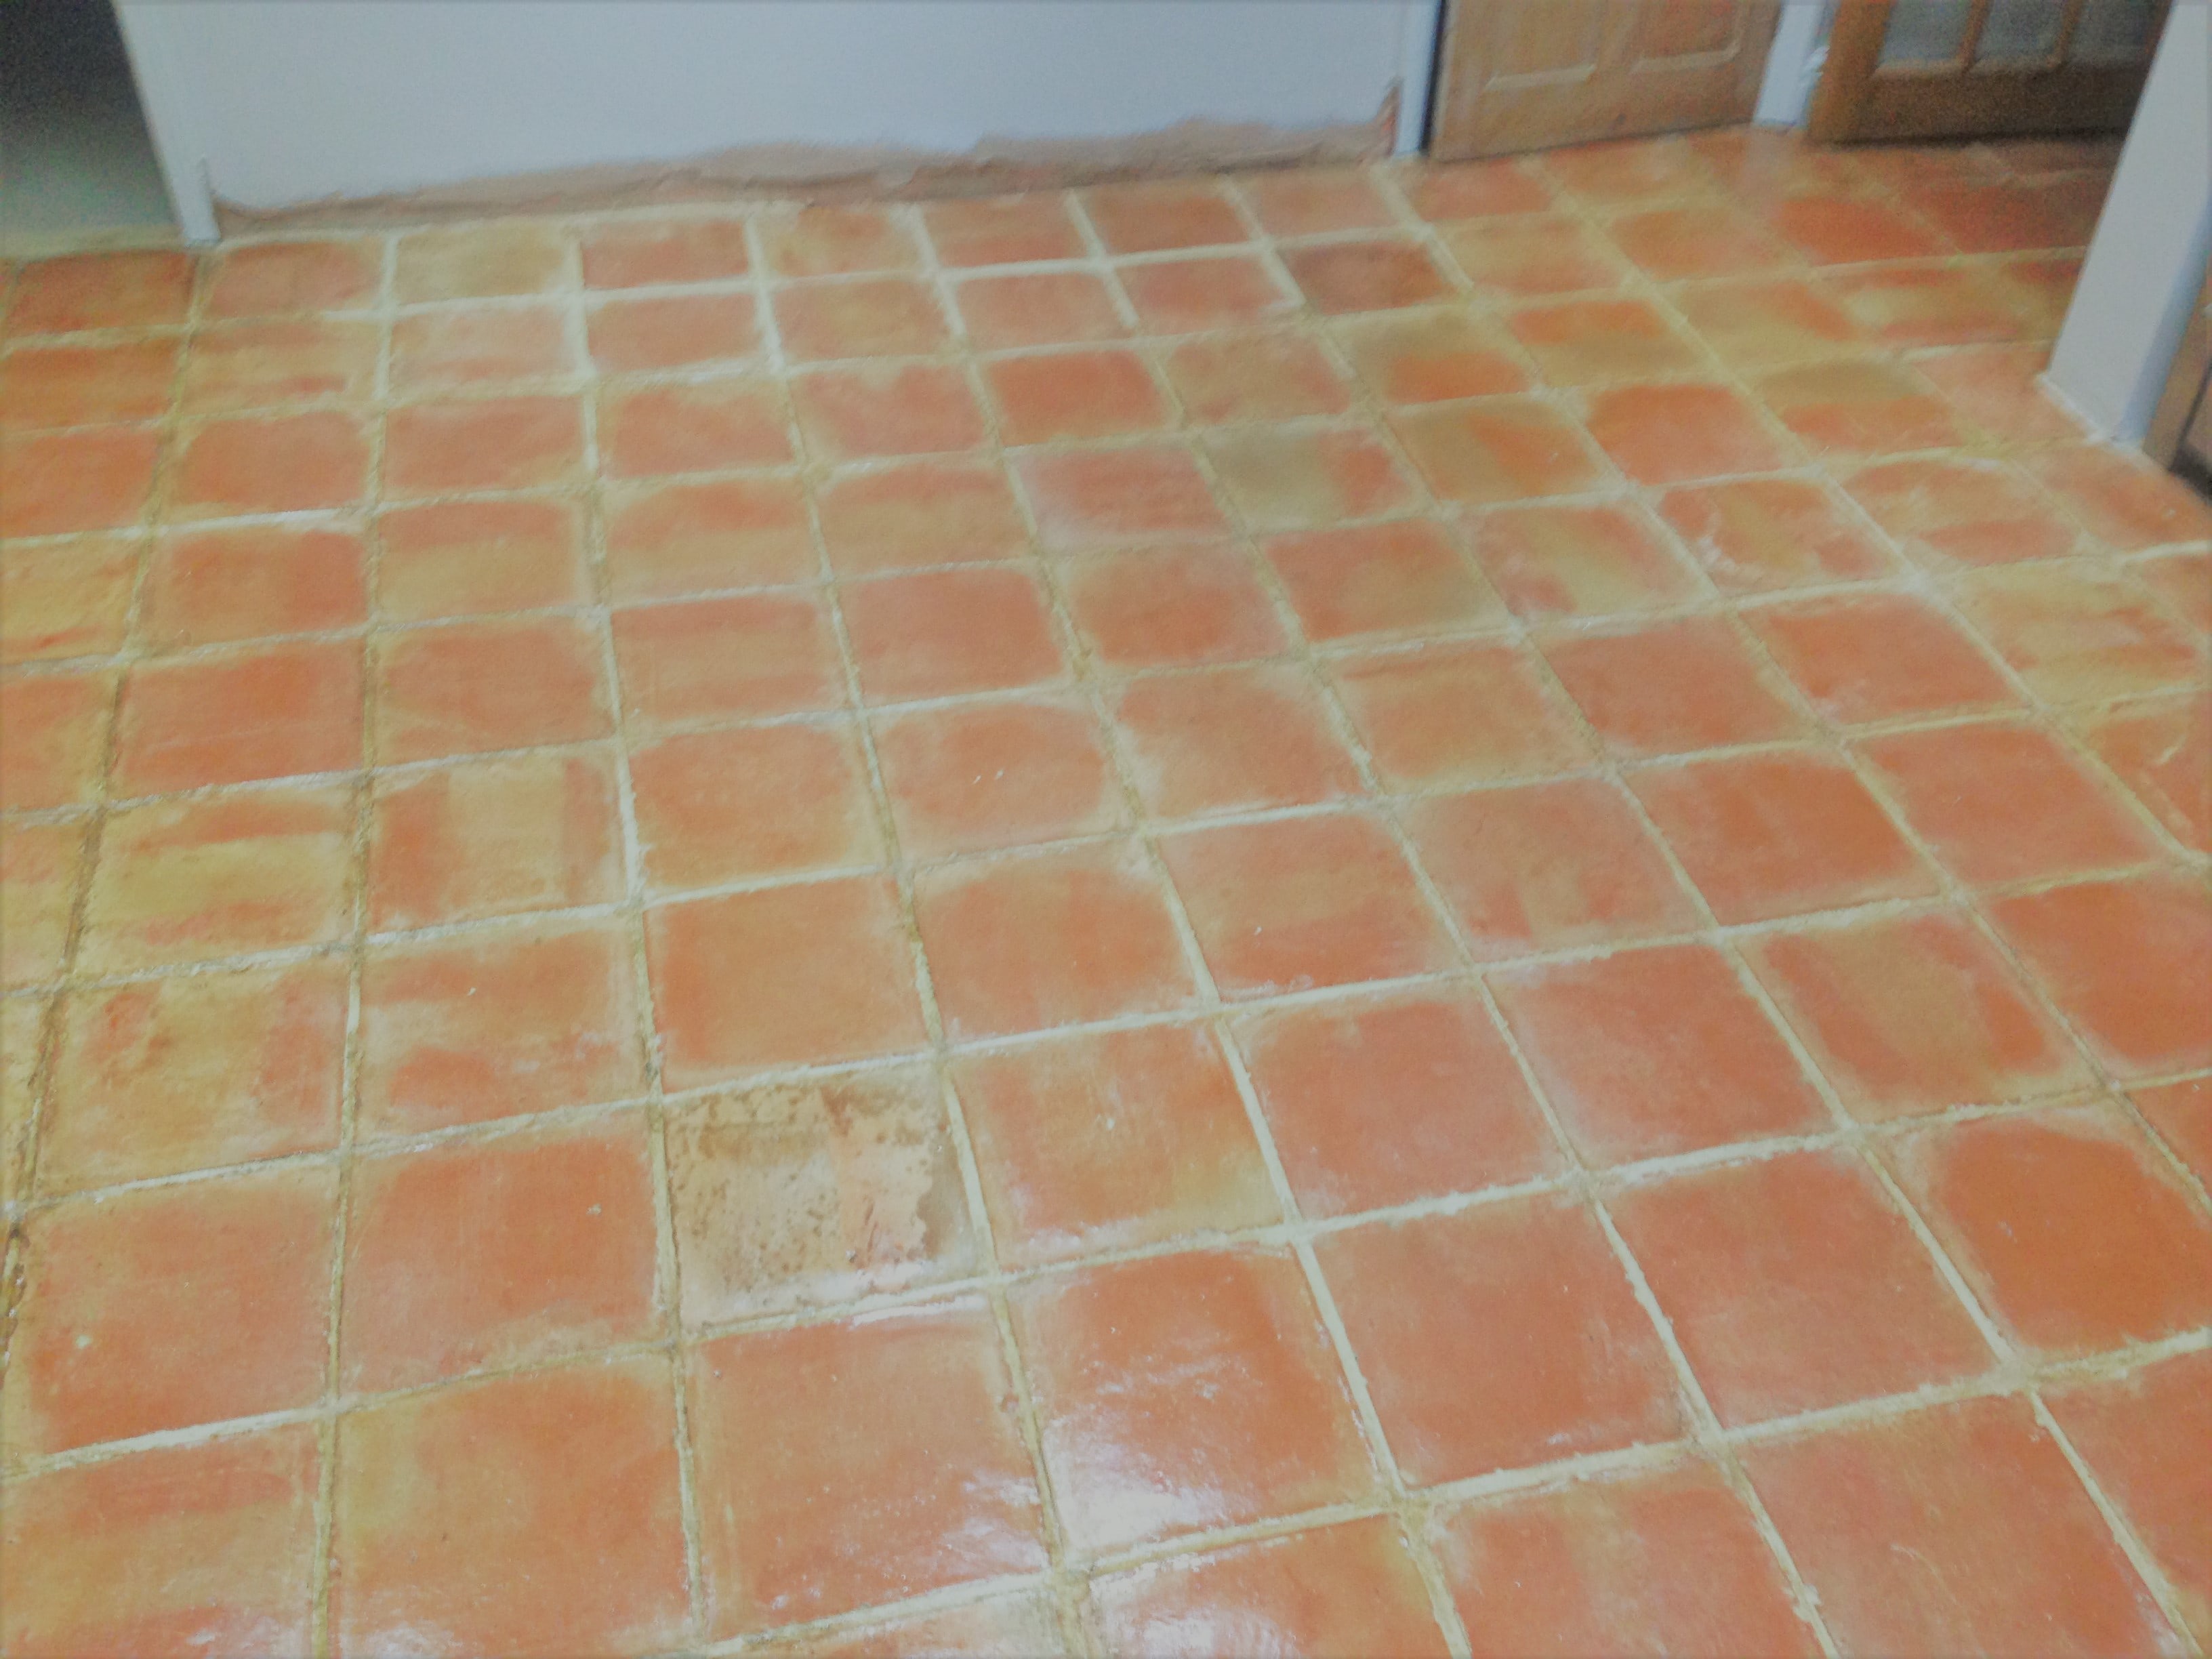
Old Terracotta Floor After Cleaning in Shenley Brook End
For an old floor that has been exposed to building work it’s now looking much cleaner and healthier; more importantly the customer was delighted with the service and left the following glowing review which is always appreciated:

Andrew and his colleagues (including Gemma in the office) could not have been more helpful and courteous. They are some of the tidiest tradesmen we’ve met! The results have exceeded our expectations and the service is very cost-effective compared to the cost of a new tiled floor, so happy customers all round. Thanks again!

Professional Terracotta Floor Renovation in Buckinghamshire

Old Terracotta floor refurbished in Shenley Brook End Read More »
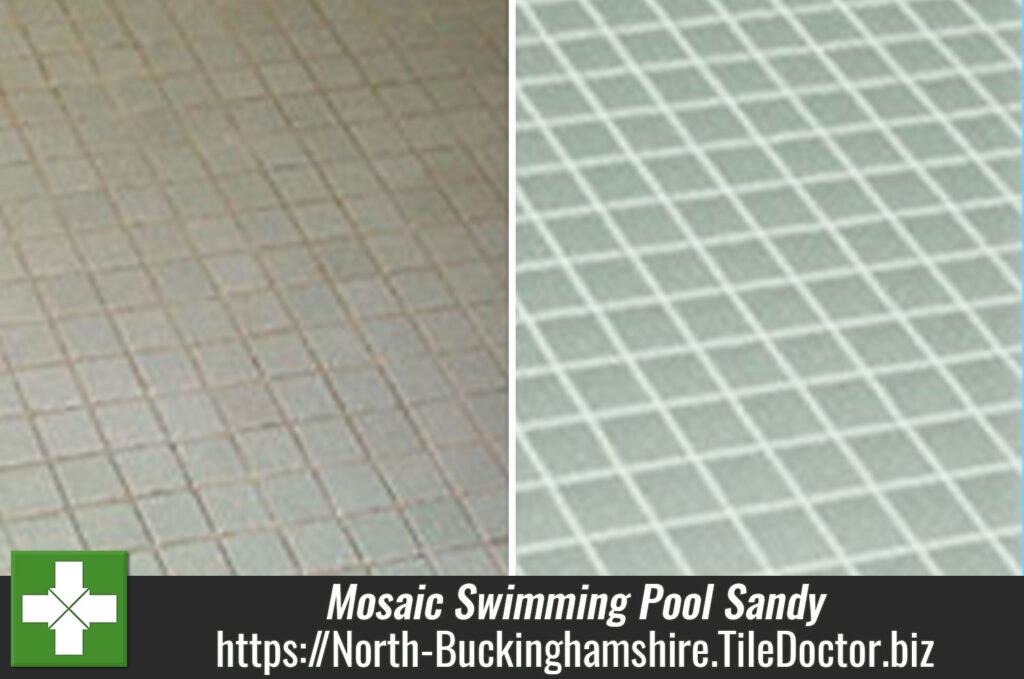
Mosaic Swimming Pool Tile Surround Cleaned Near Sandy

Mosaic Swimming Pool Tile Surround Cleaned near Sandy

As well as bathrooms and kitchens we also cover swimming pools which usually have a tiled pool surround and this was certainly the case with the photograph below which was taken at a property near the small market town of Sandy in Bedfordshire where the tile and grout around the pool had discoloured over time.

Cleaning Mosaic Pool Tiles

To clean the tiles we used a strong dilution of Tile Doctor Pro-Clean which left to soak into the tile and grout in sections before being scrubbed in using a stiff brush. You have to be careful with machinery around swimming poos as you don’t want any cleaning products draining into the swimming pool water.

Mosaic Pool Tiles Cleaned near Sandy Bedford

The pro-clean and scrubbing action loosened the dirt and we were then able to use a Rotovac machine to finish the floor off and get the results you see above. The Rotovac which is also known as a Spinner tool is a really useful piece of equipment for a Tile Cleaner as it directs a jet of high pressure hot water onto the tile whilst simultaneously removing the water through a separate suction feature. The tool needs a lot of power so it runs from a high-pressure cleaning and extractor unit fitted into our van which can delivery water pressure between 500 and 3000 PSI. Another feature of the tool is the side skirts around the spinner head which along with the high suction prevent water from being splashed around making it ideal for this job.


Removing Mould and Mildew from Mosaic Shower Tiles in Bedford

Mosaic Swimming Pool Tile Surround Cleaned near Sandy Read More »

Mosaic Shower Cubicle Tile Refresh in Bedford

Mosaic Shower Cubicle Tile Refresh in Bedford

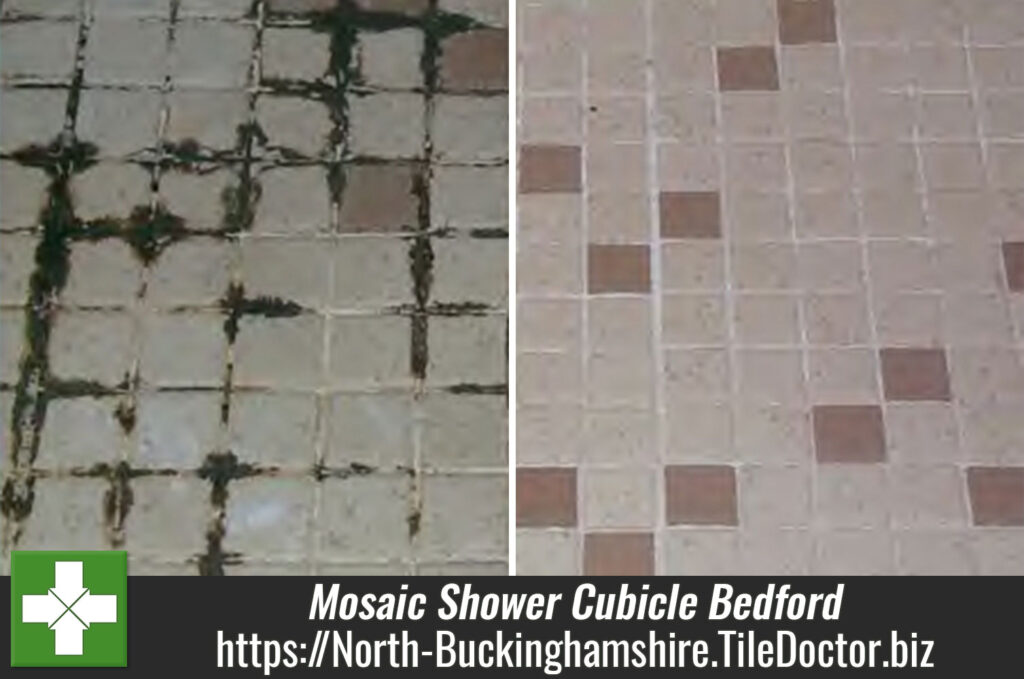
The before and after photograph below is from a job we did in a Shower Cubicle tiled with small square Mosaic tiles at a house in Bedford. As you can see from the photograph the grout had become stained with mould and mildew growth which had become quite bad and moved onto the surface of the tile.

Cleaning Mosaic Tiles

To resolve the problem a strong dilution of Tile Doctor Pro-Clean was scrubbed into the tile and grout by hand using a stiff brush. It’s best to let the Pro-Clean soak into the tile and grout for ten minutes before working in and to help the solution stick on vertical surfaces it’s best to decant the Pro-Clean into a spray bottle and spray it onto the surface of the tile, this allows it to mix with air making it lighter and enabling it to stick to the surface instead of running off.

Mosaic Shower Tile Refresh in Bedford Before and After

The mould and mildew had become quite ingrained and had managed to get quite a foothold in the grout which due to its cementitious nature is actually porous near the surface. As a result the tiles were proving very had to get clean and so working in sections the process was repeated numerous times requiring a lot of physical effort and Pro-Clean before we were happy with the results.


Removing Mould and Mildew from Mosaic Shower Tiles in Bedford

Mosaic Shower Cubicle Tile Refresh in Bedford Read More »

Deeping Cleaning Quarry Tiles Floor in Bedford

Deeping Cleaning Quarry Tiles Floor in Bedford

This floor was another case of builders failing to protect the Quarry Tiled Floor when they were working at this house in Bedford, this is certainly not un-typical of plasters considering the number of messy floors we have had to clean up previously. I guess in some ways we shouldn’t complain as they are keeping us busy but it was my floor I would be quite upset.

Deep Cleaning Quarry Tiles

To get rid of the plaster I applied a solution of Tile Doctor Grout Clean-up which is an acid based product designed to remove grout from the surface of tiles but works equally well on cement, plaster and other mineral deposits such as effloresce and rust. Working in sections the Grout Clean-up was applied, scrubbed in and then washed off, being an acid it’s not advised to leave it on the tile for too long.

Once the plaster was dealt with the whole floor including the tiles and grout was given a good clean using Tile Doctor Pro-Clean which is a strong alkaline product that’s safe to use on Tile, Stone and Grout. For best results leave it to soak into the tile for twenty minutes before giving the tiles a good scrub.

Once the tiles were clean the floor was given a good rinse with clean water to remove any remaining chemical and neutralise the floor before sealing; a wet vacuum was used to remove as much water from the floor as possible so it could dry faster.

Deep Cleaning Quarry Tiles in Bedford Before Deep Cleaning Quarry Tiles in Bedford After

Sealing Quarry Tiles

We left the floor to dry overnight and came back the next day to seal it using four coats of Tile Doctor Seal and Go sealer which adds a nice sheen to the floor as well as providing long term stain protection. The photographs above show the transformation of the floor and certainly the customer was very happy with the result.

Removing Plaster from Quarry Tiles in Bedfordshire

Deeping Cleaning Quarry Tiles Floor in Bedford Read More »

Victorian Quarry Tiled Floor Refreshed in Bedford

Victorian Quarry Tiled Floor Refreshed in Bedford

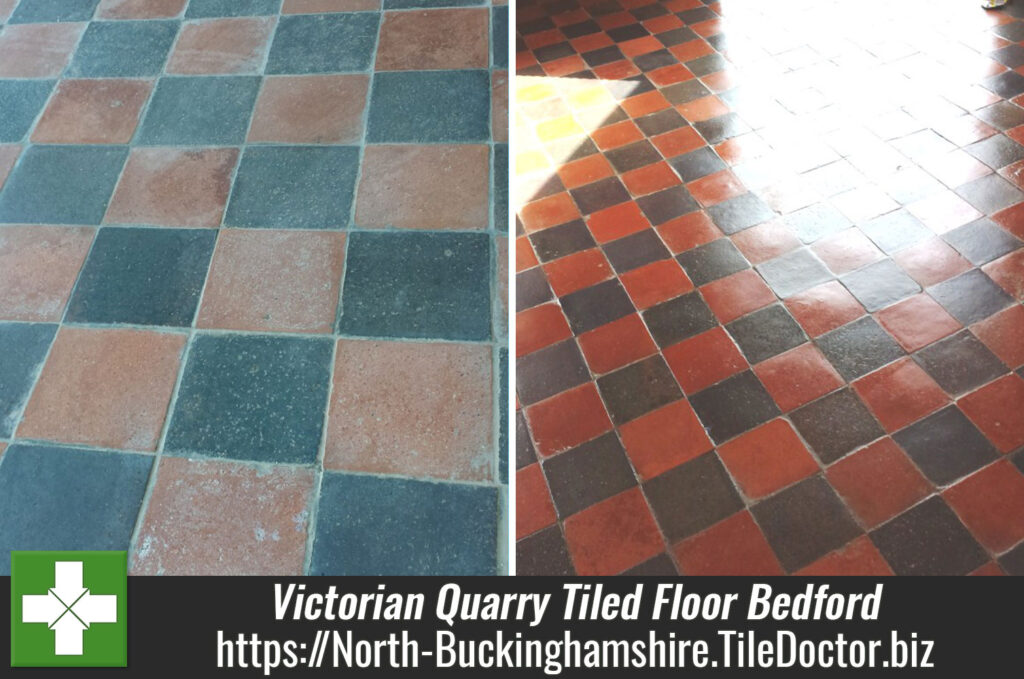
This was a very straightforward request to clean and seal an old Quarry tiled floor that dated back to the Victorian era. The tiles didn’t appear to have any sealer or other treatment applied, it could be if there was anything it had worn off a long time before.

Cleaning Old Quarry Tiles

A strong dilution of Tile Doctor Pro-Clean was applied to the floor and left to soak into the tile for around twenty minutes before being worked into the floor using a rotary floor scrubber fitted with a black pad. Pro-Clean is a strong alkaline product so unlike acid based cleaners it’s safe to use on any tile and stone which given the age of these tiles was quite an important consideration.

Pro-Clean was also used along the grout lines which were scrubbed by hand using a stiff brush. The floor was then rinsed with clean water which was removed using a wet vacuum and the whole process repeated until we were happy that the tile and grout was clean.

This process took most of the day and before we left the floor was given a thorough rinse with clean water to remove any trace of Pro-Clean as this can upset sealing later on.

Victorian Quarry Tiles Bedford before cleaning Victorian Quarry Tiles Bedford after cleaning and sealing

Sealing Quarry Tiles

The floor was left to dry overnight and when we came back the next day we were able to start the sealing process. For sealing a combination of sealers was used starting with a single coat of Tile Doctor Colour Grow; Colour Grow is a impregnating sealer that fills the pores in the tile in order to repel any contaminates that can stain the floor, it also as its name suggests brings out the colour in the tile. Once this had dried a coat of Tile Doctor Seal and Go was applied which is a topical sealer that adds a nice sheen to the floor. This proved to be a great combination and the quarry tiles looked really nice when they were finished in fact the customer was so surprised by the result we had managed to achieve.

Cleaning old Victorian Quarry Tiles in Bedford

Victorian Quarry Tiled Floor Refreshed in Bedford Read More »

Deep Cleaning Dirty Travertine Tiles at Cranfield University Hotel

Deep Cleaning Dirty Travertine Tiles at Cranfield University Hotel

This rather dirty Travertine tiled floor is located in the reception area of the hotel and conference centre of the Cranfield University, apparently the tiles had been laid ten years prior and had not been properly cleaned and resealed since.

Cleaning Tumbled Travertine Tiles

Before starting we covered all the area around the floor with masking tape and plastic sheeting to protect it from any splashing which can happen when you’re using high speed floor machines.

The tiles were in need of a good deep clean so a strong dilution of Tile Doctor Pro-Clean was applied to the floor and left to soak into the tile for twenty minutes before being scrubbed in with a using a rotary machine fitted with a scrubbing pad. The soiled solution was rinsed off using clean water and extracted using a wet vacuum repeating the process until you could see the improvement in the floor. A stiff hand brush was also used along the grout lines with more Pro-Clean to get them clean.

Travertine Tiles Before Cleaning at Cranfield University Travertine Tiles After Cleaning at Cranfield University

Burnishing Travertine Tiles

To restore the shine back to the travertine we used a set of diamond encrusted burnishing pads starting with a coarse pad and a little water fitted to a heavy rotary machine, the coarse pad strips off any remaining dirt and seal from the floor, the resulting slurry was then removed using a wet vacuum.

Once finished with the course pad we moved on to the medium and fine pads again with a little water until the floor was polished. The final “Very Fine” pad brings up the polish on the floor and buffs it to a nice shine.

Sealing Travertine Tiles

Last step was to seal the tiles which would prevent any dirt getting trapped in the pores making it easy to clean and ensuring it keeps it appearance for longer. For this we used two coats of Tile Doctor Colour Grow which as well as sealing the tiles works to bring out the natural colours in the stone.

The customer was very happy with the results and commented that they thought the transformation was amazing.

Cleaning Dirty Tumbled Travertine Tiles in Middlesex

Deep Cleaning Dirty Travertine Tiles at Cranfield University Hotel Read More »
Dirty Quarry Tiled Floor in Hitchin

Dirty Quarry Tiled Floor in Hitchin

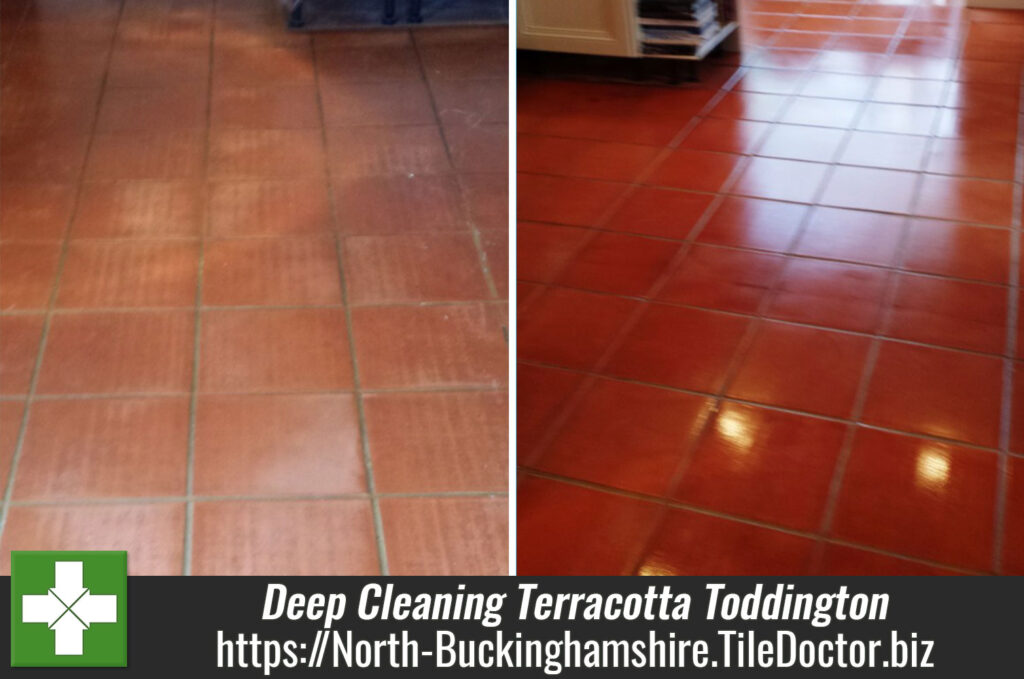
We were asked to work our magic on these dirty Quarry tiles at a residence in the historic town of Hitchin. The tiles had been sealed on a number of occasions but had not been deep cleaned beforehand which effectively trapped the dirt under the sealer making it difficult to get clean.

Quarry Tiles in Hitchen Before Cleaning

Stripping Quarry Tiles

To get them clean the coatings on the surface of the Quarry tile had to be stripped off back to the original surface. To do this we mixed a dilution of Tile Doctor Remove and Go 50/50 with NanoTech UltraClean and applied it to the floor leaving it to soak in to the tile for around 20 minutes before scrubbing it in with a wire brush. Remove and Go is as its name suggests is a coatings remover which is safe to use on Tile and Stone and is designed to remove most products from, this is assisted by the addition of NanoTech UltraClean which adds tiny abrasive particles into the solution making it more effective. The floor was then scrubbed using a rotary machine fitted with a black scrubbing pad and the grout lines scrubbed by hand using a stiff brush. The floor was then rinsed with water which was removed using a wet vacuum. The process was then repeated until we were happy that the tile and grout was clean and that the old sealer had been removed, again the floor down and being the last time washed down thoroughly as traces of cleaning products can upset sealers later on.

Sealing Quarry Tiles

Once happy with the floor and it had time to dry off it was sealed with four coats of Tile Doctor Seal and Go sealer adds a nice sheen to the floor as well as adding long term stain protection; needless to say the customer was very happy with the results.

Quarry Tiles in Hitchen After Cleaning and Sealing
 

Resolving Quarry Tile Cleaning problems in Hitchin

Dirty Quarry Tiled Floor in Hitchin Read More »

Deep Cleaning and Sealing and old Terracotta floor in Wing

Deep Cleaning and Sealing and old Terracotta floor in Wing

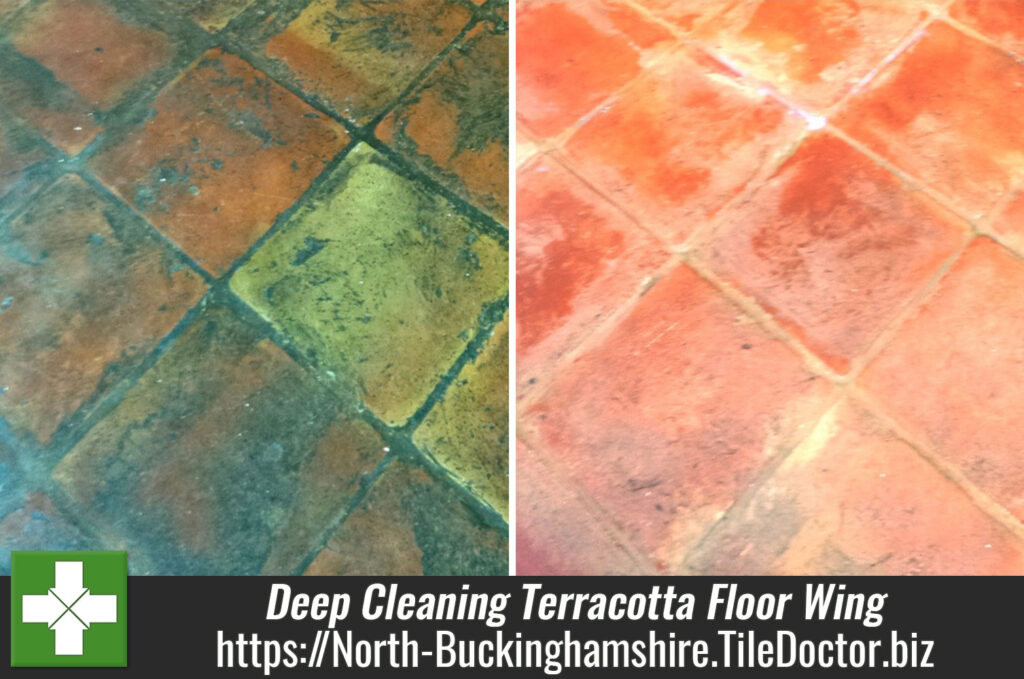
We were asked to restore the Terracotta tiled floor at an old cottage in the village of Wing which was way overdue for a good deep clean and re-seal. In fact the tiles were so dirty they were black in some areas, which you can see for yourself in the photograph below.

Terracotta Tiles in Wing Before Cleaning

Cleaning Terracotta Floor Tiles

Fortunately this sort of work is bread and butter to a Tile Doctor and the process is relatively straight forward. The first job was to apply a reasonably strong dilution of Tile Doctor Pro-Clean which is an industrial strength alkaline Tile Cleaning product that is safe to use on Tile, Stone and Grout. This was left to dwell on the tile for a while and then scrubbed into using a rotary machine fitted with a black scrubbing pad, a stiff hand brush was used on the grout where the scrubbing pad struggled to reach.

The next step was to wash the floor using a Rotovac machine which applies water at a high pressure and also removes it to a storage tank using it’s built in vacuum. This finishes off the cleaning process and also washes the floor down with clean water to remove any remaining cleaning solution and neutralise the tile to remove any trace of cleaning chemical before sealing.

Terracotta Tile Sealing

The floor was left to dry overnight and when we returned the next day when the floor was completely dry to seal using seven coats of Tile Doctor Seal and Go which works well on Terracotta providing on-going stain protection as well as adding a nice shine to the tile. As you can see the floor cleaned up really well and now looks like a Terracotta floor should.

Terracotta Tiles in Wing After Cleaning
 

Terracotta Floor Cleaning in Wing

Deep Cleaning and Sealing and old Terracotta floor in Wing Read More »

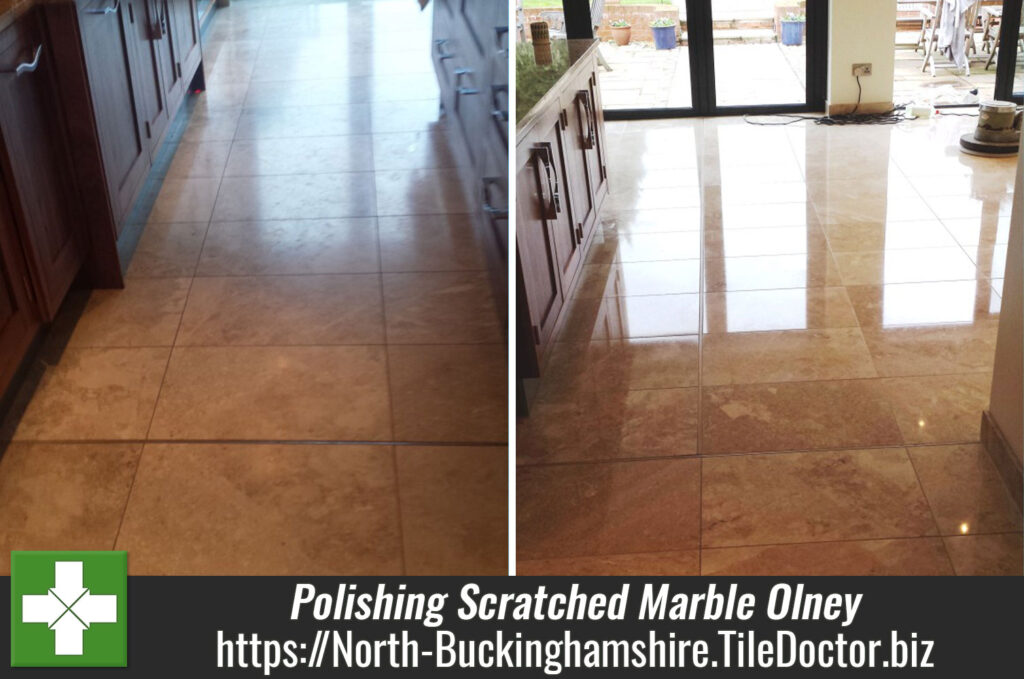
Scratched Marble Tiled floor Polished in Olney

Scratched Marble Tiled floor Polished in Olney

This was a Marble tiled floor installed in the kitchen of a house in Olney, Bedfordshire which had been scratched in places and was now overdue for some TLC.

Scratched Marble Floor Olney Before

Cleaning Marble Tile and Grout

The first job was to give the floor a general clean using a dilution of Tile Doctor Pro-Clean which was left to dwell on the Tile and Grout for a short while before being worked in with a rotary machine fitted with a scrubbing pad and a stiff hand brushes along the grout lines. The floor was then washed down with clean water to remove the soiled cleaning solution with the liquids being removed using a wet vacuum.

Burnishing and Polishing Marble Tile

To restore the original finish and remove the scratches the floor needed to be cut back using a set of diamond encrusted burnishing pads. The pads come in a set of four and you start with the coarse pad and a little water and then move on to the Medium, Fine and Very fine pads at which point the surface looks immaculate and polished.

The next task was to protect the floor and bring up the appearance even further by applying Tile Doctor Shine Powder which is polished into the floor using a buffing pad; the powder add a really deep finish to the appearance of the Marble and hardens on the surface to provide durable surface protection.

Scratched Marble Floor Olney After
Hopefully you can appreciate the difference in the Marble from the photographs; it was a tricky subject to capture due to the lighting; however I can tell you the customer was amazed by the finish.

Scratched Marble Tiled floor Restored in Olney, Bedfordshire

Scratched Marble Tiled floor Polished in Olney Read More »
Cleaning Ceramic Kitchen Floor Tiles in Bedford

Cleaning Ceramic Kitchen Floor Tiles in Bedford

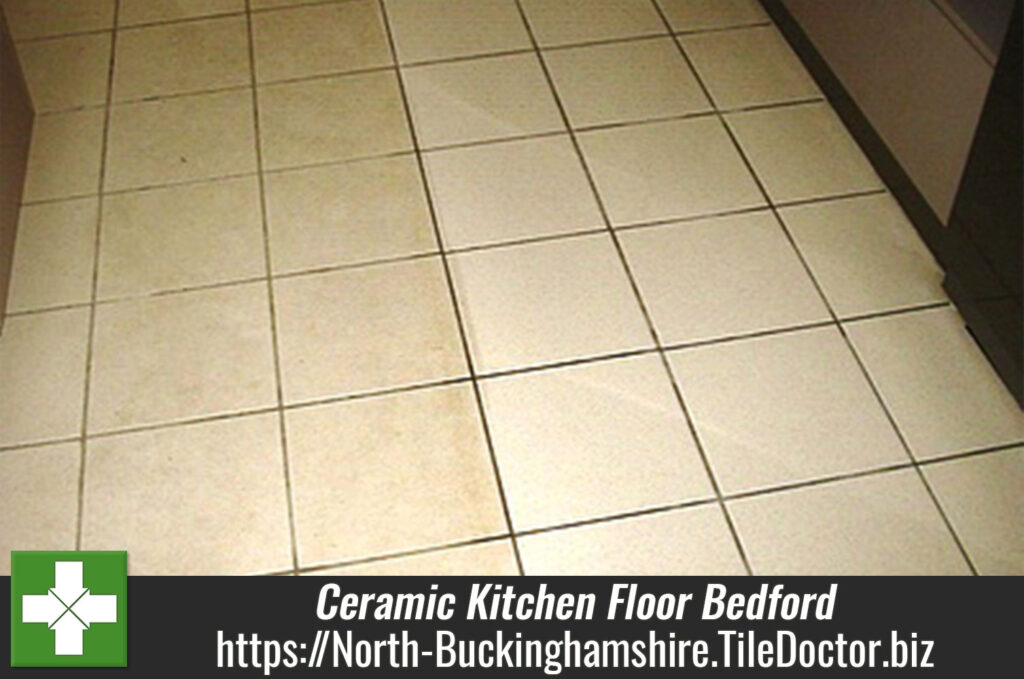
The photograph below was taken in the kitchen of a residence in Bedford where the new owner wanted the Ceramic floor tiles deep cleaned before they moved in; you can see for yourself how dirty they had become.

Cleaning Ceramic Kitchen Floor Tiles in Bedford

Cleaning Ceramic Floor Tiles

To get the clean Ceramic tiles clean I applied a medium strength dilution of Tile Doctor Pro-Clean mixed 50/50 with NanoTech Ultra Clean with a mop; this was left to dwell on the surface of the tile for around twenty minutes. The next step was to then run over the floor using our high pressure Rotovac machine which applies and removes water at high pressure to remove the soil and rinse the floor at the same time. The Rotovac machines are an expensive investment but they do make Tile Cleaning easier, they are also flexible and can be used for carpet cleaning etc.


Deep Ceramic Tile Cleaning in Bedford

Cleaning Ceramic Kitchen Floor Tiles in Bedford Read More »

Deep Cleaning and Sealing Limestone Tiled floor in Bedford

Deep Cleaning and Sealing Limestone Tiled floor in Bedford

This was a Limestone tiled floor that had seen better days, unfortunately the customer had not been given the right advice and had been cleaning the floor with a popular supermarket floor cleaning product which being slightly acidic had over time stripped all of the sealer off the tile. With no sealer present dirt and grime had become ingrained into the pores of the tile making it impossible to clean.

Limestone Bedford Olney before cleaning

Deep Cleaning Limestone Floor Tiles

To deep clean the floor I decided to use a medium dilution of Tile Doctor Pro-Clean which was left to soak into the tile for around thirty minutes before working it in with a rotary machine fitted with a black scrubbing pad.

We let the solution dwell a bit longer whilst we setup the Rotavac machine which is a brilliant piece of kit that directs fresh warm water under pressure onto the tile whilst simultaneously removing the soiled solution with a secondary vacuum back to a storage unit on the van. The combination worked well and the floor was soon looking a lot cleaner, there were some areas that needed further attention including the grout which we hand scrubbed along the grout lines.

Once happy that the tile and grout was clean the floor was then left to dry.

Sealing Limestone Floor Tiles

Once the floor was dry it was sealed using two coats of Tile Doctor Colour Grow which is a colour enhancing sealer which provides maximum stain protection on natural stone floors whilst bringing out the deep colour in the stone. The last step was to buff the floor to a nice shine with a rotary machine fitted with a white buffing pad.

Limestone Bedford Olney After Cleaning
The final result was amazing and the customer was very happy also to make sure we didn’t get called back too soon I gave them advice on how to clean the floor in the future using Tile Doctor Neutral Clean which is a PH neutral cleaner that is safe to use on Tile, Grout and Stone.

Limestone Floor Deep Cleaned and Sealed in Bedford

Deep Cleaning and Sealing Limestone Tiled floor in Bedford Read More »

Deep Cleaning and Sealing and Old Terracotta Floor in Toddington

Deep Cleaning and Sealing and Old Terracotta Floor in Toddington

This was an old Terracotta tiled floor at a house in the village of Toddington where the previous sealer had been worn off allowing dirt and soil to penetrate into the tile, naturally this made it difficult to clean and it was now overdue for a good deep clean and re-seal.

Old-Terracotta-Floor-Toddington-Before-Cleaning

Cleaning Terracotta Floor Tiles

To get rid of any remaining sealer and get the tiles clean we applied a strong dilution of Tile Doctor Pro-Clean mixed 50/50 with NanoTech UltraClean which combines a heavy duty alkaline cleaner that can also be used as a stripper with tiny abrasive particles. The resultant cleaning solution was left to dwell on the surface of the tile for twenty minutes before working it into the tiles with a rotary machine fitted with a black scrubbing pad. The soiled solution was then removed from the floor using a wet and dry vacuum and the stubborn areas re-treated. Once I was happy the floor was clean and any remaining sealer removed the whole floor was washed down to neutralise the tile and remove any trace of cleaning chemical before sealing. Leaving the old sealer on any cleaning solution on the tile could have an unexpected impact on the sealer so it’s always best to make sure this is done thoroughly.

Terracotta Tile Sealing

The floor was left to dry overnight and when we returned the next day when the floor was completely dry to seal using seven coats of Tile Doctor Seal and Go (Terracotta is very porous) which works well on Terracotta adding a nice shine to the tile as well as providing on-going stain protection. The final result looked great and will last for many years to come, the customer was so happy with the finish.

Old-Terracotta-Floor-Toddington-After-Cleaning-and-Sealing
 

Terracotta Floor Cleaning in Toddington

Deep Cleaning and Sealing and Old Terracotta Floor in Toddington Read More »
Takeaway Kitchen Quarry Tiles Cleaned Near Hockliffe

Takeaway Kitchen Quarry Tiles Cleaned Near Hockliffe

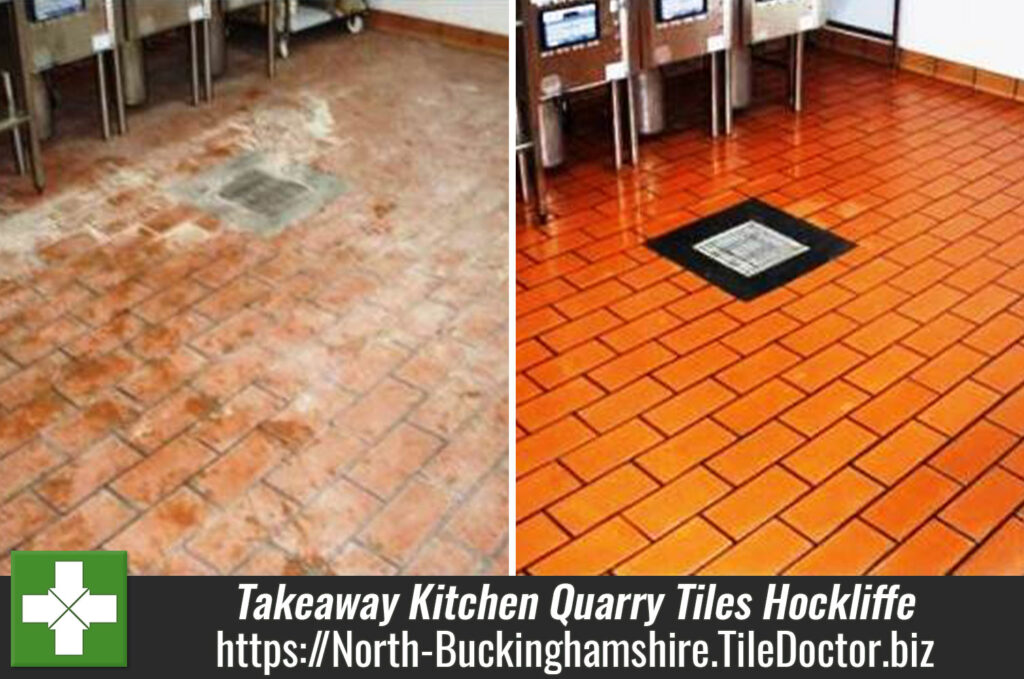
The Quarry tiles shown below were installed in the kitchen of a take away restaurant near Hockliffe, as you can see they were quite tarnished and not looking their best due to general wear and tear and the use of strong cleaning products; an inspection was also due and the proprietor was concerned it would be an issue.

Cleaning Quarry Tiles at Hockliffe Takeaway Before

Cleaning Quarry Tiles

To clean the floor tile and grout I decided to apply a strong combination of Tile Doctor Pro-Clean mixed 50/50 with NanoTech Ultra Clean and then diluted with water. This combination creates a powerful cleaning product containing nano sized abrasive particles that can penetrate deep into the dirt. The cleaning solution was left to dwell on the surface of the tile for twenty minutes before scrubbing with a rotary machine fitted with a black scrubbing pad and then washed off with a Rotovac machine which applies and removes hot water at high pressure effectively cleaning the tile and grout and rinsing then removing the water at the same time.

Cleaning Quarry Tiles at Hockliffe Takeaway After

Sealing Quarry Tiles

Once we were happy with the Quarry tile and grout was clean we left the floor to dry assisted with air blowers to speed up the process. It wasn’t long before it had dried and we were then able to the Tile and Grout using Tile Doctor High Shine sealer which should protect the floor for at least three years given the high traffic, this is of course as long as they use the correct cleaning products as acidic products will reduce the life of a sealer. The kitchen was now ready for inspection where it should pass with flying colours.

Quarry Tiled Take Away Kitchen Floor Cleaned and Sealed in Hockliffe.

Takeaway Kitchen Quarry Tiles Cleaned Near Hockliffe Read More »

Cleaning Ceramic Tiles in a Bedford Coffee Shop

Cleaning Ceramic Tiles in a Bedford Coffee Shop

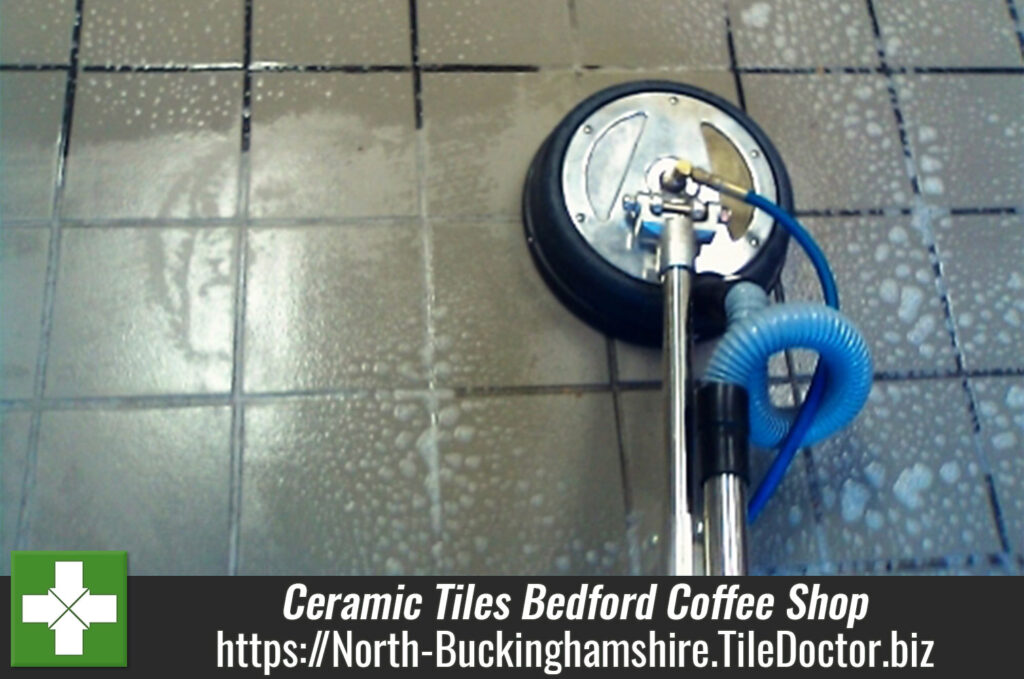
The Ceramic tiles with dark grout were installed in a Bedford Coffee Shop where we have a regular contract to deep clean the tile and grout, whilst we appreciate the regular work you do have to work out of hours to minimise impact to trade. It’s worth noting that many commercial tiling installations do avoid white grout as it can get dirty quite quickly and will be difficult to clean if badly stained, not that that’s a problem for Tile Doctor as we have a solution for most problems.

Cleaning Ceramic Floor Tiles

This was a general maintenance clean so a dilution of Tile Doctor Pro-Clean was applied to the floor and left to soak in for 20 minutes or so before giving the floor a thorough clean using a Rotovac machine which applies and removes water at high pressure to remove the dirt and rinse the floor. Once this was done we took the opportunity to apply more Pro-Clean to the grout and hand scrubbed along the grout lines using a stiff brush to ensure the black grout was clean.

Ceramic Tiles Bedford Coffee Shop Before and after
Ceramic tiles don’t normally need a sealer so once all the tile and grout was clean and was dry we were done.

Ceramic Coffee Shop Floor Tiles Cleaned in Bedford

Cleaning Ceramic Tiles in a Bedford Coffee Shop Read More »

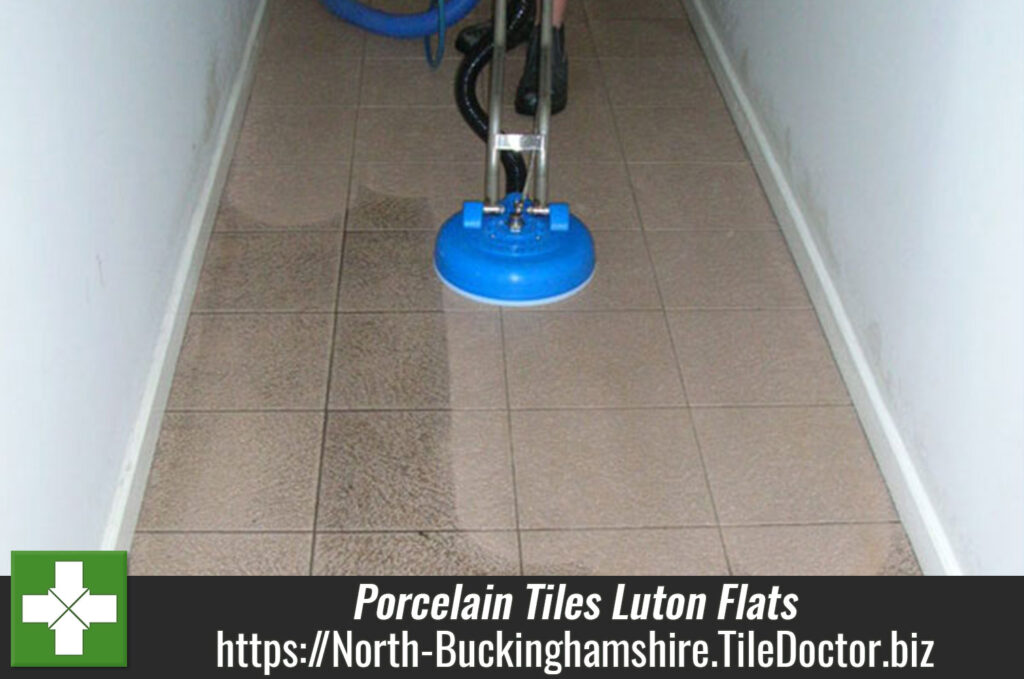
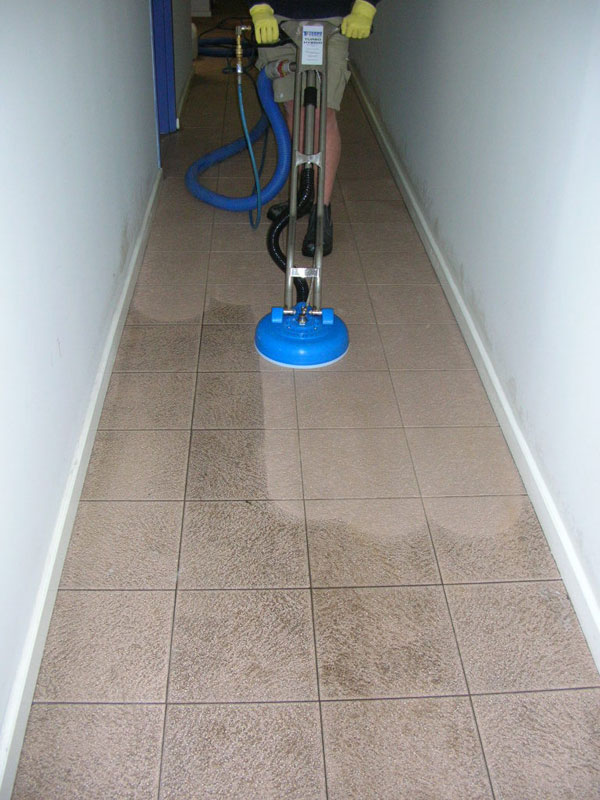
Cleaning Porcelain Tiles at Luton Flats

Cleaning Porcelain Tiles at Luton Flats

These Porcelain floor tiles had been laid in the hallway of a block of flats in Luton and had seen a fair amount of foot traffic resulting in the usual build-up of dirt and grime making it well overdue for a deep clean.

Cleaning Ceramic Floor Tiles

To clean Porcelain tiles I would normally just apply Tile Doctor Pro-Clean however given the amount of dirt in the tile we needed all the help we could get so the Pro-Clean was mixed 50/50 with NanoTech Ultra Clean which results in the creation of a powerful tile cleaner that contains Nano sized abrasive particles that can penetrate deep into the dirt. The cleaning solution was left to dwell on the surface of the tile for twenty minutes before scrubbing the floor with rotary machine fitted with a black scrubbing pad. You could see the dirt coming out of the floor at this point so once the whole floor was scrubbed I switched to a Rotovac machine which applies and removes water at high pressure to remove the soil and rinse the floor at the same time.

Porcelain Tile Cleaning Luton
You can see from the photograph above which was taken with the Rotovac machine in use the difference in the tiled floor.

Porcelain Tile Cleaning in Luton

Cleaning Porcelain Tiles at Luton Flats Read More »

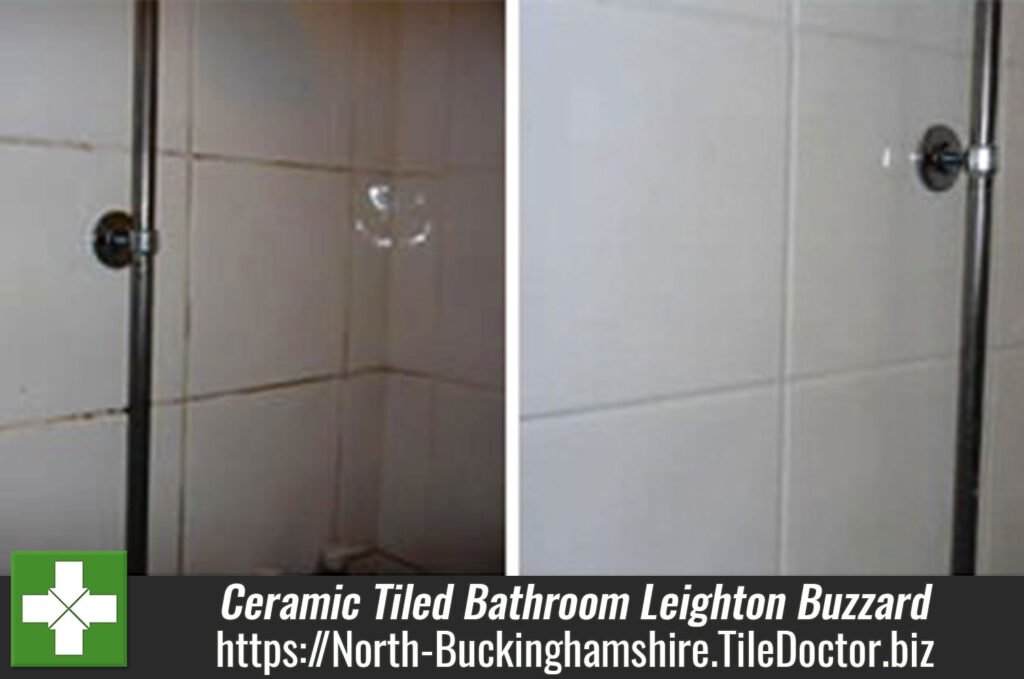
Ceramic Tiled Bathroom Cleaned and Sealed in Leighton Buzzard

Ceramic Tiled Bathroom Cleaned and Sealed in Leighton Buzzard

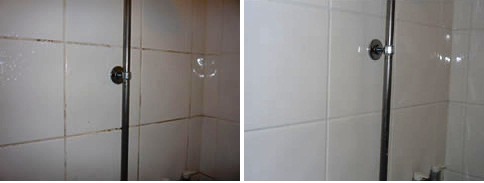
This Ceramic tiled family bathroom with shower was installed at house in Leighton Buzzard and was in need of rejuvenation. You can see from the photograph below that the tiles were in reasonable condition but the grout had become ingrained with dirt which is not unknown as the top layer of grout is porous and will discolour over time if not protected.

Cleaning Ceramic Tile and Grout

The Ceramic tiles and grout were treated using a strong 2:1 dilution of Tile Doctor Pro-Clean mixed 50/50 with Nanotech Ultraclean which combines a highly powerful Tile and Grout cleaning product with tiny abrasive particles. For vertical tiled surfaces I recommend the mixture is decanted into a bottle with a trigger spray attachment which when sprayed onto the wall allows the cleaner to mix with air making it lighter and allowing it to stick better. The solution was then worked in using a stiff scrubbing brush by hand before being rinsed off with water; this process was repeated a number of times until we had managed to clean all the areas and then left to dry.

Ceramic-Tiled-Shower-Before-and-After-Leighton-Buzzard

Sealing Grout

The grout was dried and the sealed with a couple of coats of Tile Doctor Grout Sealer which forms a protective barrier over the porous grout and keeps it looking good for longer. Most sealers can be used on grout (check the label to confirm) but for best results use a spray bottle as mixing the sealer with air improves its ability to stick to a vertical surface.

Refreshing a Ceramic Tiled Bathroom in Leighton Buzzard

Ceramic Tiled Bathroom Cleaned and Sealed in Leighton Buzzard Read More »

Terracotta Floor Maintained in Whipsnade

Terracotta Floor Maintained in Whipsnade

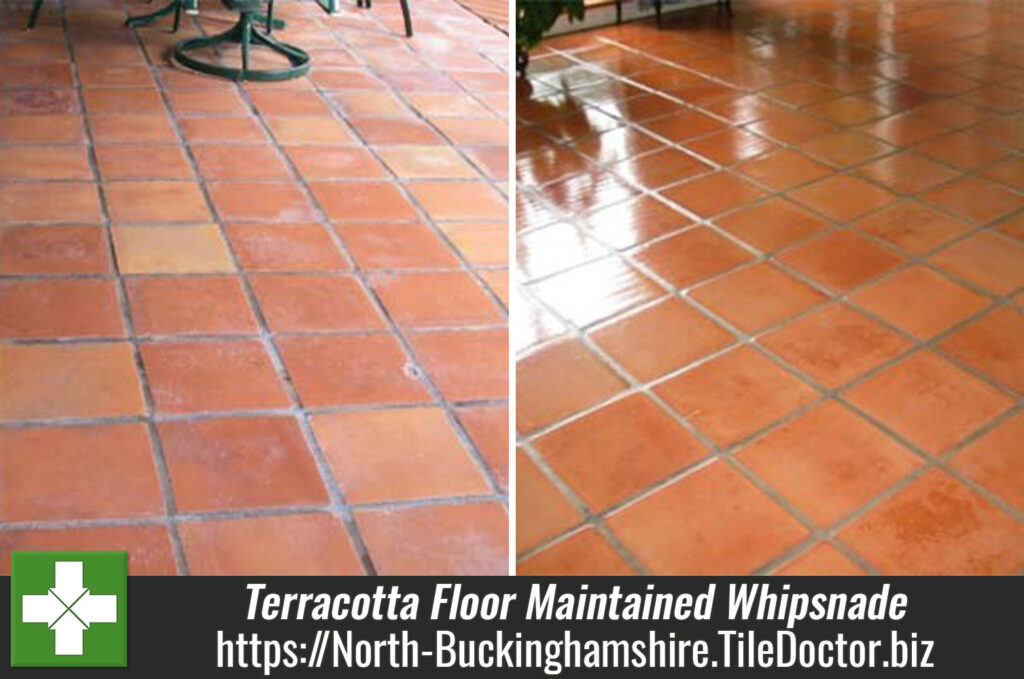
Pictures below of another Terracotta tiled floor that was deep cleaned and then sealed, this time in Whipsnade. You can see from the photograph below the floor was in good physical condition but was looking washed out and had staining to the grout.

Terracotta Floor Whipsnade Before Cleaning

Cleaning Terracotta Floor Tiles

To deep clean the Terracotta tile and grout I applied a strong dilution of Tile Doctor Pro-Clean mixed 50/50 with NanoTech Ultra Clean to produce a heavy duty alkaline cleaner with nano sized abrasive particles that can clean deep into the tile. The resulting solution was left to soak into the Terracotta for 10-20 minutes before being worked in with a Rotovac machine fitted with a Tile and Grout head attachment. The Rotovac is a powerful and versatile tool that can also be used to clean carpet as well as tile and connects to separate machine that feeds high pressure water to the unit as well as generating a vacuum to remove the dirty water back to a separate tank. Once we were happy that the floor we left for the day so the floor could dry.

Terracotta Tile Sealing

We returned two days later to seal the floor which we did using a combination of two compatible sealers. First off we applied two coats of Tile Doctor Colour Grow which is a premium impregnating sealer that soaks into the tile and brings out the natural colour. Once this was dry five coats for Tile Doctor Seal and Go were applied which is a surface sealer that adds a nice subtle sheen to the floor as well as topping up the stain protection.

Terracotta Floor Whipsnade After Cleaning and Sealing
 

Terracotta Floor Maintained in Whipsnade

Terracotta Floor Maintained in Whipsnade Read More »

Tired Quarry Tiled Floor in Dunstable School Refurbished

Tired Quarry Tiled Floor in Dunstable School Refurbished

Before and after photograph below of a Quarry Tiled floor at a school in Dunstable that was in such a bad state we had to apply grout colourant to the floor. Quarry tiles are fairly indestructible so ideal for use in schools etc. where they will see a lot of foot traffic and abuse, having said that they will fade with wear over time and naturally the grout can become ingrained with dirt if not protected.

Cleaning Quarry Tiles

It had been a while since the Quarry Tiles and Grout had been given a really deep clean to so we mixed a dilution of Tile Doctor Pro-Clean 50/50 with NanoTech UltraClean and applied it to the floor and left to soak in for around 10 minutes; Pro-Clean is a multipurpose alkaline cleaning product designed specifically for cleaning tile and stone and NanoTech UltraClean adds tiny abrasive particles into the solution to make a more effective cleaner. The floor was then scrubbed using a rotary machine fitted with a black scrubbing pad and the grout lines scrubbed by hand using a stiff brush. The floor was then rinsed thoroughly with water which was removed using a wet vacuum, once the Quarry tiles were dry it was possible to spot the areas in need of further attention and these were scrubbed by hand together with more of the Pro-Clean/UltraClean mix and a steamer. At this stage it became apparent that that although the grout had improved it was too far gone and never going to make the grade and either needed to re-done or as per our suggestion re-coloured.

Grout Colouring

For floor grout we always recommend the use of an epoxy grout colouring product which not only completely covers the grout making it look new again but also provides a permanent barrier that prevents the grout from staining in future. They can be quite time consuming to apply however especially if you have a small format Quarry tile with lots of grouting.

Sealing Quarry Tiles

Once happy with the floor and it had time to dry off it was sealed with six coats of Tile Doctor High Shine Sealer which will provide future surface stain protection and also leaves a nice deep shine on the floor. It took a long time but I think you will agree from the before and after photograph below we managed quite a transformation.


Restoring Quarry Tiles at a School in Dunstable

Tired Quarry Tiled Floor in Dunstable School Refurbished Read More »

Cleaning Ceramic Tiles at Luton High street restaurant

The Ceramic floor tiles shown below were installed in a Luton high street restaurant, as you can see they were far from clean, deeply stained and even the grout had gone black.

Ceramic Floor Tiles Luton Restaurant Before

Cleaning Ceramic Floor Tiles

Given the amount of dirt on the tile and grout we decided to apply a very strong combination of Tile Doctor Remove and Go mixed 50/50 with NanoTech Ultra Clean which results in the creation of a heavy duty stripper/cleaner containing nano sized abrasive particles that can penetrate deep into the dirt. The cleaning solution was left to dwell on the surface of the tile for twenty minutes before using a Rotovac machine which applies and removes water at high pressure to remove the dirt and rinse the floor.

Ceramic Floor Tiles Luton Restaurant After

Glazed ceramic tiles won’t take a sealer so once the entire floor was dry and stubborn areas re-done we were finished.


Ceramic Restaurant Floor Tiles Cleaned in Luton

Cleaning Ceramic Tiles at Luton High street restaurant Read More »

Terracotta Tiled Floor Cleaned and Sealed in Leighton Buzzard

Terracotta Tiled Floor Cleaned and Sealed in Leighton Buzzard

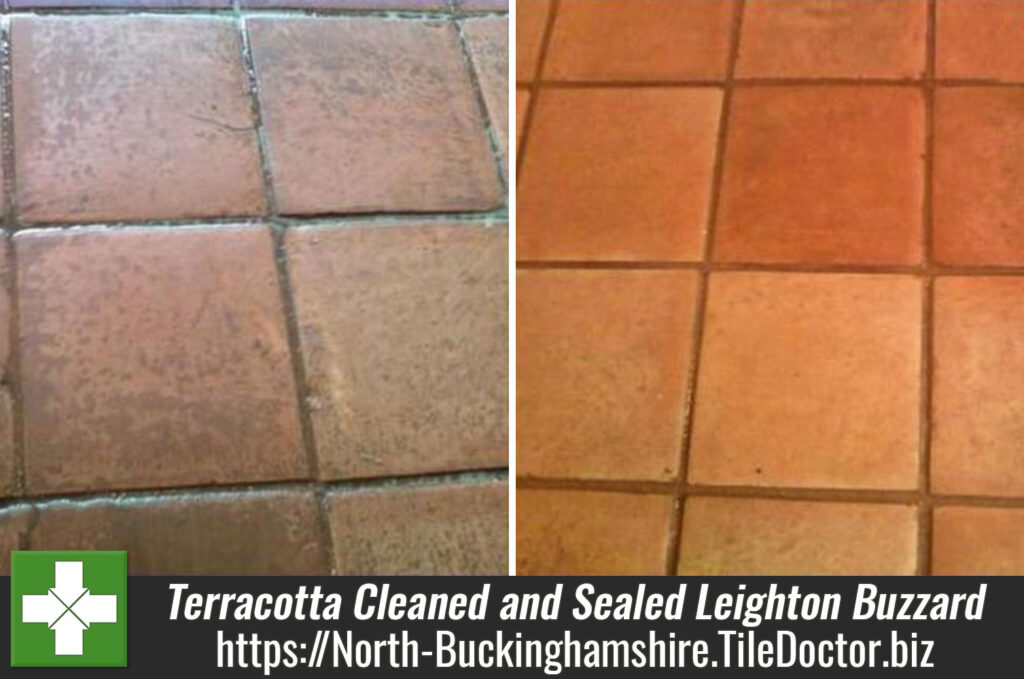
Details below of a Terracotta tiled floor at a house in Leighton Buzzard which was in need of a deep clean and re-seal.

Cleaning Terracotta Floor Tiles

To get the tiles clean we applied a strong dilution of Tile Doctor Pro-Clean mixed 50/50 with NanoTech Ultra Clean which combines into a heavy duty alkaline cleaner containing nano sized abrasive particles that cleans deep into the tile. For best results let the cleaning solution dwell on the surface of the tile for 10-20 minutes before working it into the tiles with a rotary machine fitted with a black scrubbing pad. The soiled solution was then removed from the floor using a wet and dry vacuum and the stubborn areas treated with a steamer, following that the whole floor was washed down to remove any remaining chemical before sealing.

Leighton Buzzard Terracotta Before and After

Terracotta Tile Sealing

We returned when the floor was dry to seal using seven coats of Tile Doctor Seal and Go (Terracotta is very porous) which works well on Terracotta adding a nice shine to the tile as well as providing on-going stain protection.

Terracotta Floor Maintained in Leighton Buzzard

Terracotta Tiled Floor Cleaned and Sealed in Leighton Buzzard Read More »

Scroll to Top